Blackface Twin Reverb Restoration Thread

  • Thread starter ReWind James
  • Start date
  • This site may earn a commission from merchant affiliate links like Ebay, Amazon, and others.

monstruo_loco

Silver Supporting Member
Joined
Aug 10, 2020
Messages
286
Reaction score
418
Looks good to me, but the bold print on the repro caught my eye only after you mentioned something was off, and at first I thought it was just that it was the difference of a blank plate without pots & knobs installed. Not sure if that’s what you’ve noticed, but from the photos that’s what I’m able to see.
 

ReWind James

ReWind Electric Pickups Gear & Instrument Services
Double Platinum Supporting Member
Joined
Mar 11, 2009
Messages
22,065
Reaction score
39,834
Looks good to me, but the bold print on the repro caught my eye only after you mentioned something was off, and at first I thought it was just that it was the difference of a blank plate without pots & knobs installed. Not sure if that’s what you’ve noticed, but from the photos that’s what I’m able to see.

Ya, that's it! The font.

It was the very first thing I saw the moment it slid out of the packaging. All the other little details, and the fancy cursive branding, are all copied so wonderfully. ...but they used some stock bold font that looks like big fat bubble letters, especially under the jacks, but under all the controls, as well.

Like I said, I'm sure I'm just too particular when it comes to something like that, right front, top center on the amp. It jumps out at me. I'll be quite pleased to use it on a replica amp build later on, or pass it along knowing it's a solid product to someone else in need, just not for an original restoration for me, personally.

I'm not likely to find another clean original BFTR panel, though, so I had better do a great job of straightening the original one out! My plan, at the moment, is to sandwich it between two perfectly smooth and flat pieces of steel, along with plenty of lubricant to keep the enamel from rubbing off. ....or just leave it alone (often the best policy). ...maybe just touch up the corners? Ugh. Got some thinking to do on that part, but I also have time. Open to suggestions, as well.
 

ReWind James

ReWind Electric Pickups Gear & Instrument Services
Double Platinum Supporting Member
Joined
Mar 11, 2009
Messages
22,065
Reaction score
39,834
The only thing I'm found to sound a bit strange is the reverb is a bit "slapback-ish" or "stuttery" compared to all my other 60's Fenders. It sounds like the springs are really tight or something (probably a poor assessment, just the first thing that it reminded me of). I checked the tank and it is original. I can't imagine that what I'm hearing is a result of the replacement transformer, but maybe? I'm not going to worry about that part now. It's not "bad" sounding, just different. Spankier.

Well, I figured this part out. One spring-pair of the tank was disconnected and flopping around loose inside. At first, I was pleased, thinking it was an easy fix with no missing parts. ...but I am missing a part, unfortunately. Here's the transducer on the side labeled "input" which is actually an output. Fender - man. Those guys and their backwards terminology! Tremolo, vibrato, input jack, output jack, reverb in, etc. Still confusing musicians a half century later.

i.php


So, this is the assembly that I'm missing on the second half of that transducer.
i.php


I'm not sure what to call it but I'm thinking what it is is a piece of thin steel wire, bent back on itself to create a loop for the spring end to hook through, with a little ferrite core magnet first clipped over that loop, and the two tails of the steel wire fed through the little brass tube, suspended in the center, and attached to the far end of the brass tube by a big glob of solder.

Is that what I'm looking at?

So the little ferrite core magnet wiggles between the steel laminates that pass through the transducer coil, changing the energy between mechanical and electrical. That would make sense. Is that what it is? If that's what it is, I can repair it with once I find that little ferrite hollow core magnet, probably from another tank. It would be easier to repair that for me (and more original) than swapping the entire transducer, as it's riveted in.
 

ReWind James

ReWind Electric Pickups Gear & Instrument Services
Double Platinum Supporting Member
Joined
Mar 11, 2009
Messages
22,065
Reaction score
39,834
New reverb tank on the way. The transducer seems to be the same as mine, so I should be able to rob it of a couple parts and get mine running properly.

I got a little work in on the transformers and chassis tonight. All three transformers and the choke needed a little love. The chassis needed more than a little.

The output transformer was badly bend. The laminations seem just fine but not only were the legs bent, but the actual steel chassis under the legs was pulled out like a couple of ant hills under two of the mounting screws. I didn't get a photo of it, but I did manage to flatten out the chassis around the holes with a few clamps and 3/4" blocks of steel.

i.php


The choke was bent but just needed its feel straightened and flattened to get right again.
i.php


The reverb driver transformer was unoriginal. It did take me a while but I managed to track down a perfect original with a matching 1966 code stamp.
i.php

i.php

i.php

i.php
 

ReWind James

ReWind Electric Pickups Gear & Instrument Services
Double Platinum Supporting Member
Joined
Mar 11, 2009
Messages
22,065
Reaction score
39,834
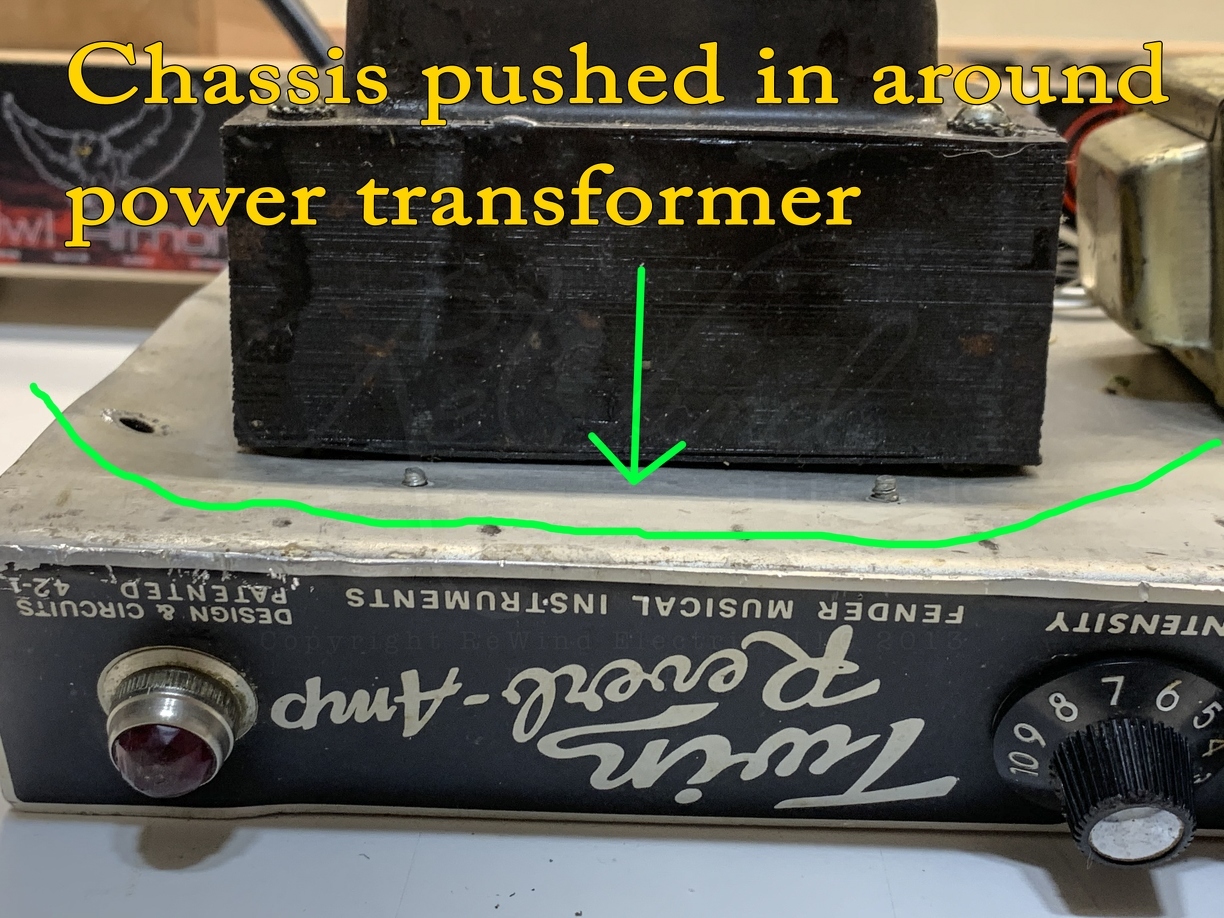
The damage to the chassis around the power transformer has been something I've been dreading getting into. The damage could have happened by the amp taking a fall and landing square upside down on its top side, with the mass of the transformer pushing into the chassis. I'd have expected the same damage sound the output transformer, though, where the chassis is even weaker, being in the center. So, at first, I thought this wasn't likely how it happened. However, looking on the inside, several of the wires exiting the power transformer have damaged insulation, repaired with heat shrink, and one wire even replaced, right where they exit. This makes me think the transformer actually was pushed in while installed in the cabinet, as that damage to the wires in that area was likely caused by pulling the damaged chassis out of the cab and scraping those wires against the "chicken wire" shielding on the top of the amp. Anyway, that's my best guess, right now. If this amp could tell stories! ...well, shoot! I guess it is telling stories, really!

i.php


20200716155834-8214995e-xl.jpg

i.php


Here's where the wires were damaged and repaired, inside. I'm thinking about replacing them because I'm obsessive, but they are probably fine. I'll see how clean the rest starts looking when I address the real problems.
i.php


This was a really daunting part of the repair. The chassis was mangled in complex three dimensional ways. I was inspired by a conversation I had with my friend Harley, many years ago. He worked a job doing collision repair. He explained to me how they repaired the cars frames by making whatever type of jig in the job would allow them to recreate the impact exactly in the way it occurred, but by pulling the opposite direction and in a slow and controlled way. So that's exactly what I set out to do.

Here you can see where I've moved the wires out of the way and placed some wooden blocks on the inside of the transformer bell cover to press against it.

i.php

i.php


...and now for some of that controlled force in the opposite direction as the original impact.
i.php


After a little more, focused on this one stubborn area right near the edge.
i.php


Ya! That's basically perfect! MUCH better than even I expected.
i.php


Harley, if you're out there reading this, you're a wise wrench-turner!
 

Soul Tramp

Speaker Snob
V.I.P. Member
Joined
Jul 19, 2012
Messages
11,467
Reaction score
32,716
Just now catching up with your thread. What a fun project!

I used an aftermarket faceplate when I resto-moded my Bassman. The plate has very crisp text, not blurred/bubbly like the plate you bought. Are there other vendors you can consider? Unfortunately the picture below doesn't show the crisp quality of the text (my cell phone camera sucks).

Great job on the chassis work. I hate the metal fabrication work. The cabinets are a LOT more fun.


Faceplate_r.jpg
 

ReWind James

ReWind Electric Pickups Gear & Instrument Services
Double Platinum Supporting Member
Joined
Mar 11, 2009
Messages
22,065
Reaction score
39,834
Just now catching up with your thread. What a fun project!

I used an aftermarket faceplate when I resto-moded my Bassman. The plate has very crisp text, not blurred/bubbly like the plate you bought. Are there other vendors you can consider? Unfortunately the picture below doesn't show the crisp quality of the text (my cell phone camera sucks).

Great job on the chassis work. I hate the metal fabrication work. The cabinets are a LOT more fun.


View attachment 510629

Well, yes and maybe?

I know TAD makes them. Their example photos are low quality so I wasn't sure about the details. They are also unbranded (none of the text near the pilot lamp). I considered, but did not, contact them about making me a branded one.

Mojotone also makes them. They want the entire original faceplate shipped in for them to replicate, though. I wasn't about to do that and I've also not seen any examples.

The ones I've seen that are super nice are from Rogers Amplification, but I don't think he's still in business?

I'm going to just have a go at straightening mine out and hoping I don't mess up the graphics. I have a little more faith in myself after I sorted out the chassis around the transformer. I'll PM ya, too! :thumb:
 

ReWind James

ReWind Electric Pickups Gear & Instrument Services
Double Platinum Supporting Member
Joined
Mar 11, 2009
Messages
22,065
Reaction score
39,834
One cracked socket and one missing bear claw on a different socket. ...though I'm not really sure the other three bear claws are original, as clean as they are. I'll confirm that and track down an appropriate amount.

i.php


Very minor damage on that socket, so I think I'll leave it alone. If I put in some vintage 6L6GCs, I can probably expect them to last quite a while (longer than me, perhaps) and not stress the socket, further.
 

ReWind James

ReWind Electric Pickups Gear & Instrument Services
Double Platinum Supporting Member
Joined
Mar 11, 2009
Messages
22,065
Reaction score
39,834

Soul Tramp

Speaker Snob
V.I.P. Member
Joined
Jul 19, 2012
Messages
11,467
Reaction score
32,716
I had considered it. Is it appropriate for the heat that will be rising along it?


I don't know the technically correct answer, but when I was flying RC planes we'd use sg in areas of considerable heat (engine cowlings) without a problem.

However, maybe a high-temp epoxy would be best.
 

CB91710

Not Michael Sankar
Double Platinum Supporting Member
Joined
Jul 19, 2019
Messages
34,340
Reaction score
117,847
One cracked socket and one missing bear claw on a different socket. ...though I'm not really sure the other three bear claws are original, as clean as they are. I'll confirm that and track down an appropriate amount.

i.php


Very minor damage on that socket, so I think I'll leave it alone. If I put in some vintage 6L6GCs, I can probably expect them to last quite a while (longer than me, perhaps) and not stress the socket, further.
Pins 4 and 5 you'll probably be OK.
I wouldn't trust that kind of damage on pin 3, which is the plate, but 4 and 5 are the grids.
The worst one is pin 5, which is the control grid, so it's not carrying high voltage.
 
Last edited:

CB91710

Not Michael Sankar
Double Platinum Supporting Member
Joined
Jul 19, 2019
Messages
34,340
Reaction score
117,847
I don't know the technically correct answer, but when I was flying RC planes we'd use sg in areas of considerable heat (engine cowlings) without a problem.

However, maybe a high-temp epoxy would be best.
Cured super glue will get brittle and offgas when heated.
More than a few times I'd apply a little too much heat trying to get the covering down on the wing center section and the glue would kick and blast me in the face.

Personally, I'd either leave it as it is, or replace it entirely.
 

Soul Tramp

Speaker Snob
V.I.P. Member
Joined
Jul 19, 2012
Messages
11,467
Reaction score
32,716
Cured super glue will get brittle and offgas when heated.
More than a few times I'd apply a little too much heat trying to get the covering down on the wing center section and the glue would kick and blast me in the face.

Personally, I'd either leave it as it is, or replace it entirely.


I really really miss building R/C planes! Such a perfect hobby for anyone who's obsessed with detail work.
 

ReWind James

ReWind Electric Pickups Gear & Instrument Services
Double Platinum Supporting Member
Joined
Mar 11, 2009
Messages
22,065
Reaction score
39,834
I got my donor reverb tank in, today. Though I've never been inside one of these transducers, fortunately, the internal construction was nearly exactly as I expected - steel loop, with a little round magnet on it, that protruded back through the brass tube and held in place by a big glob of solder. Only the long thin wire was no steel, only the loop. The long thin wire seems to be copper and much finer than I imagined.

i.php

i.php


One thing I did not count on was that the brass tube was also full of tar. ...or some primitive sort of black silicon glue, but I'm going with tar. This made fishing that super thin wire through the brass tube extremely difficult for even me, a fellow who fishes super fine wire through much smaller holes, daily, in pickups. ...just not generally full of goop (Bill Lawrence, I'm looking at you!).

Another thing I hadn't counted on was that the brass tubes are held in the black plastic bracket by it being molded around them, apparently. They were not made to come out. ...but with the tar in there, I decided drilling a small hole through the center was the best way to fish the wire clear through the tube and out the other end.

With a little bit of heat, I was able to remove the brass tube, drill through it's tarry center, fish the thin copper wire through and bend and solder it in place.
i.php


So, there it is! Fully working (I have another old Twin around to test it with), all period correct parts from Accutronics, and everything original, other than that little steel hook and magnet. Do you suppose the magnets were "better" in 1966 than in 1968? Maybe I've shorted myself! :rofl: I laugh at this, but someone will ask me this about a Gibson pickup tomorrow, undoubtedly, and I'll have to give it some honest consideration to provide a fair answer.

i.php


I only paid $30 for the donor tank, shipped. It was sold as dead but the only problem was one of the jumper leads to the other transducer had come loose and needed to be soldered back on. So, I've got four more vintage springs, the other whole transducer, half of the transducer I sole my parts from, and the aluminum chassis parts, mounting springs and bumpers, jacks, etc. Nice to have spares or be able to help out a friend in need.


"Unrepairable" part, my ass!
 

ReWind James

ReWind Electric Pickups Gear & Instrument Services
Double Platinum Supporting Member
Joined
Mar 11, 2009
Messages
22,065
Reaction score
39,834
Buttoned the tank back up and cleaned the bag with my favorite stuff, Ballistol.

i.php


Box in the bag. Bag in the box.
i.php


I think I'm done with everything outside of the amp chassis, finally. Now, if only I can manage to sneak a few hours to go through the electrical components swapping out non-original parts and mapping all the values. Also, still have some chassis straightening to do and, the part I'm now dreading the most, straightening the faceplate without loosing graphics.
 

ReWind James

ReWind Electric Pickups Gear & Instrument Services
Double Platinum Supporting Member
Joined
Mar 11, 2009
Messages
22,065
Reaction score
39,834
Got started marking out values on the electrical components. This one had 22 resistors that were out of spec, and I didn't check the doghouse, yet. Most only by a little, 15-20% on 10% resistors, but all the 5% bias section resistors were way out, as are all the screen grids. Put a hurtin' on my NOS AB stash!

The output tubes that were in this when I got it were two Sovtek 5881s and two JJ 6L6GCs, and they were biased way off and not remotely close to matched.

I have a feeling the blue caps will all be fine, but I'll lift the legs and give them the fire, anyway. They have a potentially perfect record with me, so far, of never leaking. Every once in a while I have to throw a 50's Sprague Bumblebee on my TO-6 A, just to confirm it's still working properly, as those old Bees are really terrible capacitors and almost always leak, even at low current.

i.php

i.php

i.php


Pretty sure this orange ugly is original, not by the solder but by looking at more photos of 66/67 Twin Reverbs, though it's not what I'm accustomed to seeing in this position of this era amp. I have some of the brown ITWs and I'm giving consideration to swapping it out. hmmm....
i.php

i.php
 

ReWind James

ReWind Electric Pickups Gear & Instrument Services
Double Platinum Supporting Member
Joined
Mar 11, 2009
Messages
22,065
Reaction score
39,834
Got most of the drifted and non-original resistors and all the inside electrolytics swapped out.

i.php


i.php


I'll go back and clean all the flux up with alcohol, once I'm really done.


I still have the screen resistors and swampers to change, the non-electrolytic caps to check, and everything in the doghouse. I think that will warp up the electrical components, unless I want to swap out that long orange Sprague. Oh, I also don't remember if this amp has the trem tick or not. It's been at least 6 months since I fired it up, now. So far, my experiences has been that silverface amps can have the tick cured just by wire management, but blackface amps need a cap added, if they have the tick. It will be interesting to see what this one needs, being a later blackface AB783, if it does tick and needs that addressed.
 

Latest Threads


Top
')